If you have a TrueNas and want to save backups from the Proxmox-Backup-Server (PBS) onto it the best way to connect the two is via iscsi. Reason being that PBS uses a lot of small chunks which is very slow over NFS, CIFS or SFTP.
ISCSI on the other side handles storage just as local block devices and encapsulates the SCSI-commands in IP-packets. That way small or large chunks doesn’t make such a difference.
TrueNas Setup
We will start by setting up our TrueNas to present ISCSI Targets.
Targets are the ISCSI equivalent to shares on NFS or SMB. Basicly storage that is presented to the client (called initiator).
I will assume that you already have a ZFS-Pool setup.
Create ZVOL
ISCSI does not work with datasets. Only with zvols.
To create a zvol, select you StoragePool or Parent-Dataset, click on Add Zvol and give it a name and size.
Enable ISCSI
Next we need to enable the ISCSI Service on TrueNas.
Therefore go to System Settings -> Services and enable ISCSI
Create ISCSI Target
Now we will create an ISCSI-Target for that zvol. That way we can present the storage of the zvol to an initiator.
Go To Shares -> Block (ISCSI) Shares Targets -> Wizard
The Name is just for reference on the TrueNas Site.Extend Type should be Device
The Device is you selected ZVOL
The Sharing Platform changes some defaults for the ISCSI Settings. Since PBS is basically a Debian-Linux Modern OS matches best.
Since I don’t have a target yet. I will create a new one.
Once that is set, click next.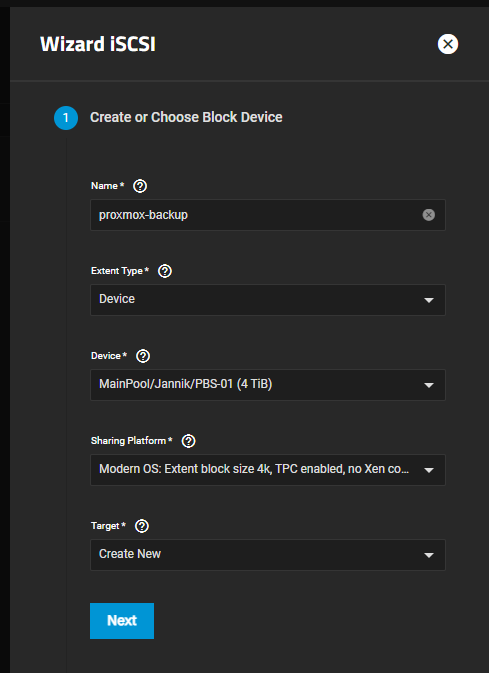
The Portal is the Interface on which the ISCSI-Storage is presented. You can either use all Interfaces(0.0.0.0) or limit it to a specific one.
Then click Next.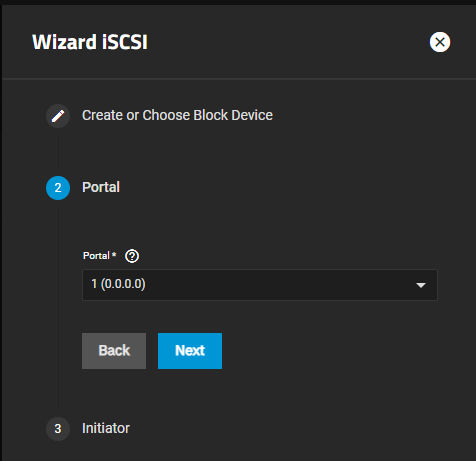
The last step will ask for the initiator-names. We will leave it blank for now, since we have to configure our PBS first, to copy it’s initiator-name.
Prepare Proxmox Backup Server
Now connect to the Proxmox Backup Server. Either via ssh or the Shell in the webui.
First we will install the necessary packages.
apt update
apt install open-iscsi
The installationprocess will also create a unique initiatorname. We will specify this initiatorname on our TrueNas server to limit the ISCSI-Target to only this Initiator. That way only our PBS can access this storage.
Now we need to get our initiator name. It is saved in /etc/iscsi/initiatorname.iscsi.
InitiatorName=iqn.1993-08.org.debian:01:33f1edc83a60
You may change this one or keep it as it is.
Next we will setup authentication.
Open /etc/iscsi/iscsid.conf and set a username and password. You can freely choose them, since they are not yet setup in TrueNas.
...
node.session.auth.authmethod = CHAP
...
node.session.auth.username = <username>
node.session.auth.password = <password>
...
discovery.sendtargets.auth.authmethod = CHAP
...
discovery.sendtargets.auth.username = <username>
discovery.sendtargets.auth.password = <password>
Setup TrueNas Authentication
Now we need to add these credentials and the initiatorname to TrueNas.
Go to Shares -> Block (ISCSI) Shares Targets and click on configure.
Go to the Tab Authorized Access and click Add Authorized Access.
Select a Group Id, probably 1, if you don’t have created one already. Then enter the username and password from your Proxmox-Iscsi configuration. Then hit Save.
Then go back to shares and click on your newly created ISCSI target.
Set Authenticaton Method to CHAP and the Group Number to what every you set on configure.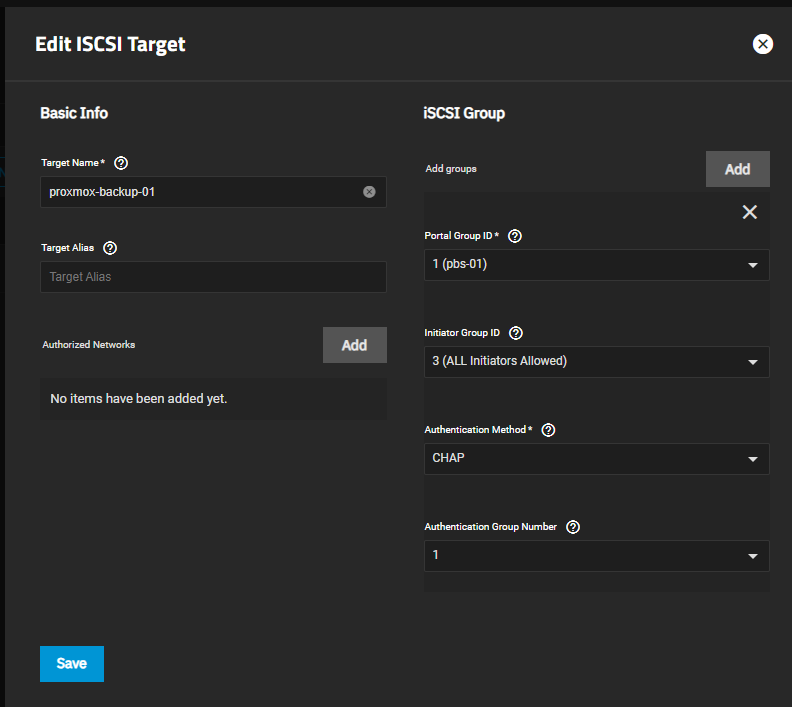
Connect ISCSI on Proxmox Backup Server
Now that the Target on TrueNas is setup, we can connect to it from the Proxmox Backup Server
First we need to start the ISCSI-Service.
systemctl enable --now iscsid iscsi
Then we need to discover the Target. That way we have the exact name of the ISCSI-Share.
iscsiadm -m discovery -t sendtargets -p <truenas-ip>
This will show an output like this.
10.0.5.1:3260,1 iqn.2005-10.org.freenas.ctl:proxmox-backup-01
Next we need to login to that target, we got from the discovery command.
iscsiadm -m node -T iqn.2005-10.org.freenas.ctl:proxmox-backup-01
Of course you -T will look different depending on the output of the command before that.
Now you should see a new disk appearing.
lsblk
sdd            8:48   0    4T  0 disk
Create Datastore
At this point we can handle the ISCSI-Share just as any other drive.
To use this new volume we need to create a filesystem and mount it.
mkfs.xfs /dev/sdd
Next get the uuid of this disk
root@proxmox-backup-server:~# lsblk -f
NAME         FSTYPE      FSVER    LABEL UUID                                   FSAVAIL FSUSE% MOUNTPOINT
sdd          xfs                        0f5769c5-d4f3-4dfe-9d3d-2304ba32b2be
Then open the /etc/fstab and enter the following line but with your uuid.
UUID=0f5769c5-d4f3-4dfe-9d3d-2304ba32b2be /mnt/datastore/truenas-backup-01-pbs xfs _netdev 0
It is important to use _netdev so that the os will only mount this drive is the network is initiated. Otherwise your server will not boot since it is waiting to find the drive with this ID locally.
Then create the Mountpoint and mount it
mkdir /mnt/datastore/truenas-backup-01-pbs
mount -a
Now you can create a datastore with the Webinterface.
And that is it. Now you can use TrueNas storage for your Proxmox Backups.